Managed Identities and Key Vault Are A Swift Way To Tailor Your Security

I Don’t Want To Keep Secrets Just To Keep You (…Protected Online)
My previous post on securing Azure Resources with Private Links prompted me to think about other quick-wins when it comes to security - particularly things which leverage in-built Azure utilities. Managed Identities and the Azure Key Vault are two of those utilities which work together brilliantly. I’m going to focus on a specific use case which is probably the most straightforward introduction to them: keeping secrets in the vault and accessing them securely..
In my opinon, there is a hideous amount of opaque and torturous prose written about Managed Identities, Service Principals and so on - everything to do with auth, really - which can make it incredibly hard to get going with this stuff. I’ve tried to keep this to some of the essential principles (as a useful reminder for me, if nothing else).
Opportunity: You Have Secrets
You don’t want your secrets to end up splashed on the news front page. Everyone knows you mustn’t commit ‘secrets’ (api keys, client ids, connection strings etc) to your repo, and therefore nobody does it. You definitely keep your secrets in environment variables and/or configuration files, carefully keeping those used for local development tucked securely on your workstation, and those for production delicately ensconced in the Environment Variables section of your Azure Web App. Lovely. Really good practice. Well done.
But let’s say you have something even more sensitive than usual, or better, that your client says: I want to increase security in all layers, across the board. Tell me about some best practices you’ve recently introduced to handling secrets in our application. Can you make it easier to control access to connection strings, and harder to leak api keys by accident?
Yep!
This is your opportunity to unload your vast knowledge about Managed Identities and Key Vault.
What Is Key Vault?
Key Vault is a secure, cloud storage resource for managed secrets, keys and certificates encrypted using software libraries validated to FIPS 140 Level 1. You can read lots about it in the official documentation but at heart it’s easy to grasp as a kind of advanced password manager, keeping select data private except to carefully defined users.
What Are Managed Identities?
It’s tempting to go into too much detail on Managed Identities so let’s stay aggressively simple: think of a Managed Identity as a permissions container which can be assigned to workloads and resources (not just humans) in Azure.
In real life, because you follow the principle of least privilege, you give your hapless but well-meaning designer colleague Gavin RBAC roles for exactly what he needs to do. He was someone who until recent events you shared your secrets with. He can read the blobs in your blob storage account, which he needs to download the latest company logo vectors to incorporate into his patterned wallpaper designs, but he can’t write or delete blobs, and he certainly can’t make container deployments and stuff like that.
Managed Identities allow you to treat resources like Gavin. You create a managed identity with carefully scoped, specific permissions (such as ‘read blob storage in this account), and then you assign it to a resource, like a Web App. With a little configuration, that web app can then access that blob storage without needing a connection string written down anywhere.
Using Them Together
Your EF Core infused .NET web application needs to initialise a database context with a connection string when it starts (and let’s say that database isn’t secured with Microsoft Entra, but a more traditional SQL connection string).
Rather than reaching into Environment Variables or appsettings.SuperSecretProdOnly.json to get that string, you can store it in the Key Vault. Then you can assign a Managed Identity with Key Vault reading permission to your web app. No human eye ever even needs to see the secret. Cool!
Real World Step By Step Example
You’ve relented, and allowed Gavin to help you co-manage your pet project: a Taylor Swift lyric interpretations web app, Cruel Summeries (sic). You both believe that, if you can express a high level of insight while demonstrating a compassionate yet intellectual close reading of both her popular and less well known records, it may gain her notice, possibly leading to a long and worthwhile friendship with the talented singer/songwriter.
The thing is, Gavin is notoriously sloppy with his clipboard and you just know he’s going to be ctrl-c, ctrl-v-ing your connection string everywhere by accident if he gets his hands on it, and the last thing you want is unscrupulous haters getting the super admin user password for what amounts to the most important project in your life. You don’t want Gavin to blow it for you but you have to admit his dev skills would be useful.
You want him to have the source code, but to keep his grubby mitts of the connection string.
This is how you’re gonna do it. Each step is very simple (though there’s a bit of a gotcha situation in Step 4 so do double-check that bit).
- Create a Key Vault, Store A Secret
- Create a Managed Identity
- Give the Managed Identity Permission
- Assign the Managed Identity to the App
- Update the the app code with Azure Credentials
1. Create a Key Vault & Store A Secret
Our goal is to create a Vault, and store our Connection String as a Secret for secure retrieval.
Portal
Head over to Create Resource and search for the Key Vault resource type.
You have usual Azure options like pricing tier (choose standard unless you want to encrypt with your own physical keys(!)), and a choice of permission model. Use RBAC - the standard way of assigning an managing user permissions with Azure / Entra ID - as the Policy model is on the way out. 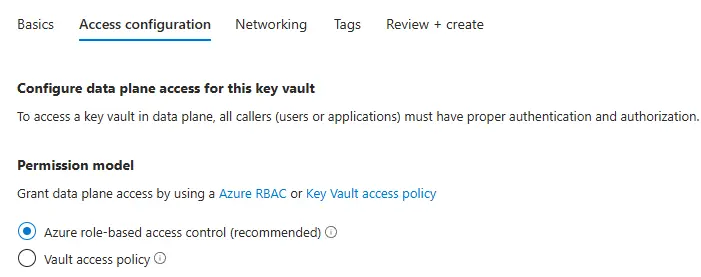
There are some additional security configurations you can make, such as restricted network access right off the bat; see what works for you. Give it a useful name: it can be helpful to run multiple key vaults for different logical separations, or different security perimeters, so keep that in mind when you name it. This is the only one we need for this project though so we’ll call it cruel-summeries-secrets.
With a security hat on: remember the principle of least privilege and the Zero Trust strategy when you’re configuring any security related stuff in the cloud. If you can make your deployment work while removing public access to a resource, definitely do that.
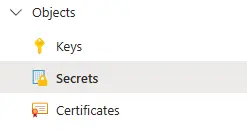
Once your Key Vault exists, go to the Secrets section.
Use the Generate / Import button to create a new secret. You’ve got some great options here, like setting an expiry date (which you can configure notification events against later, if you like) - but for now just wham your connection string into Secret Value field, and give it a memorable, useful, name like cruel-summeries-db-cstring.
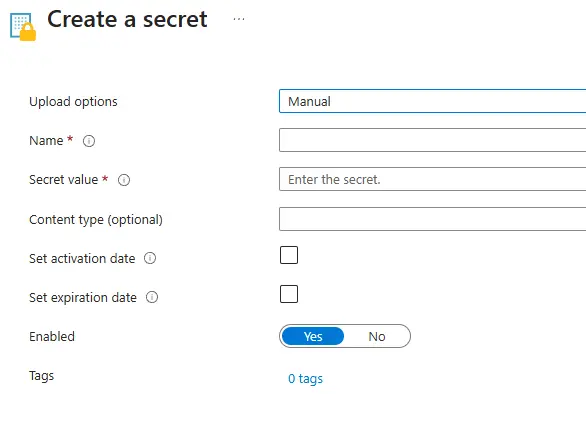
Don’t write your secret in the Content Type field by accident. You’ll feel like a dumbass. Ask me how I know! Here I sit alone, behind walls of regret.
az cli
1
az keyvault create --name cruel-summeries-secrets --resource-group resource-group --enable-rbac-authorization true
Learn more about the Key Vault CLI here.
Azure PowerShell
1
New-AzKeyVault -Name "cruel-summeries-secrets" -ResourceGroupName "resource-group" -Location "UKSouth" -EnableRbacAuthorization true
2. Create a Managed Identity
Portal
Search for Managed Identities in the top bar, head to the interface and click “Create”. As ever, choose a region and resource group and give it a name: maybe cruel-summeries-id.
That’s it, and it’s effectively instant.
az cli
1
az identity create --name cruel-summeries-id --resource-group resource-group --location UKSouth
Read more about the az identity cli here.
Azure PowerShell
1
New-AzUserAssignedIdentity -ResourceGroupName "resource-group" -Name "cruel-summeries-id"
3. Give The Managed Identity Permission
Key Vault has some very particular permissions which make an important distinction between the resource layer and the data layer, allowing you to set up permissions for identity based management of the vault itself, listing of secrets, without necessarily allowing access to the secrets themselves.
For this kind of managed identity use, you only need to assign the ability to read secrets - nothing else.
Portal
Go to the Key Vault Resource’s Access Control (IAM) panel, and click “Add Role Assignment”.
Filter the Role List with the words Key Vault and pay careful attention to the Role Descriptions. What you’re looking for is Key Vault Secrets User, not Reader. The former is the role which allows access to the secrets themselves. The ‘Reader’ can only read metadata.
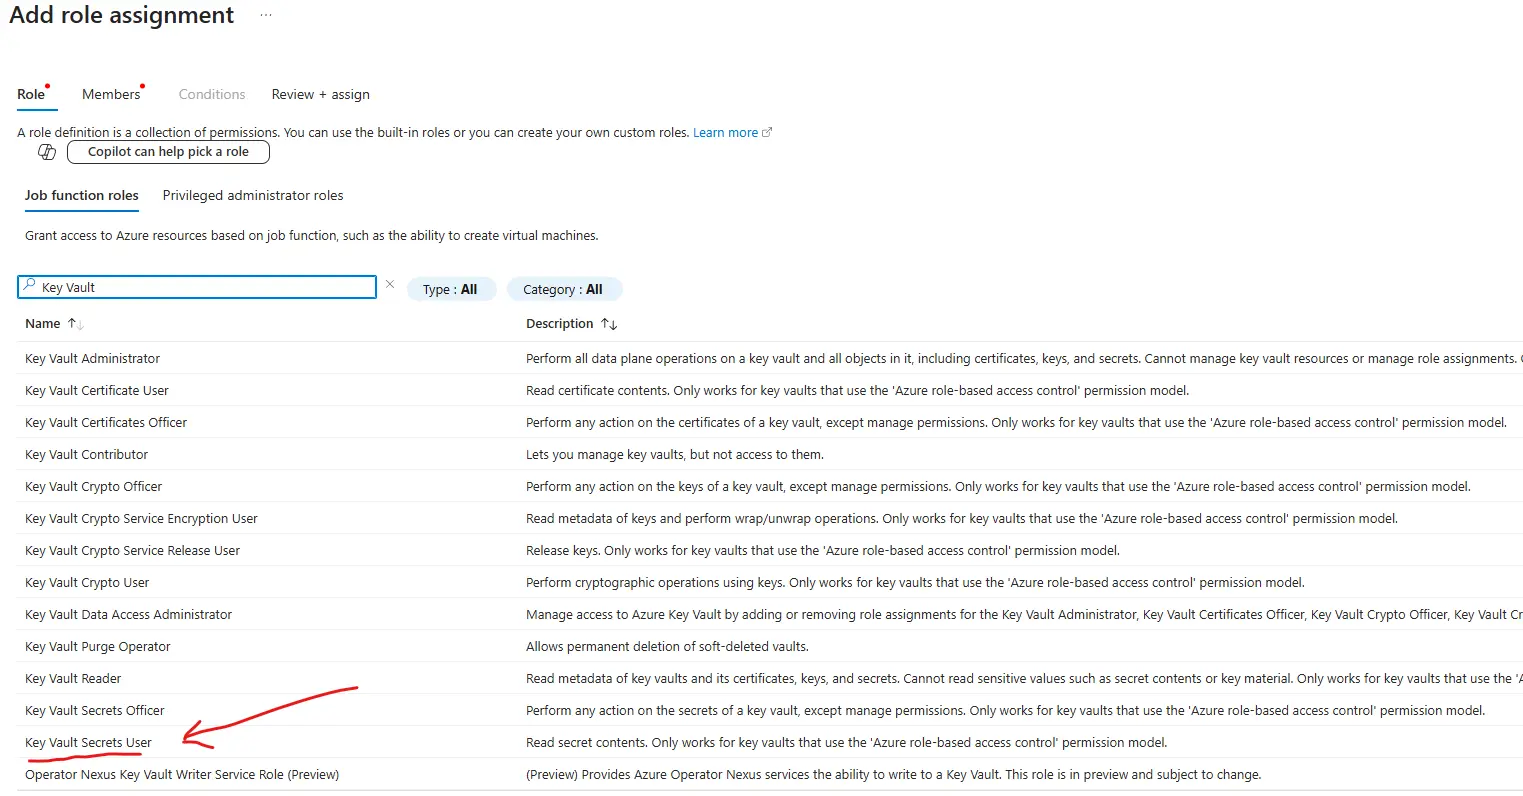
Choose this role, then find your managed identity in the Members list on the next tab, and complete the assignment.
Congrats - you’ve now got a managed identity which can read your Key Vault secrets. Gavin absolutely cannot.
az cli
This command passes the exact Role Name and the specific resource name to create a Role Assignment scoped exactly to this resource (rather than the Resource Group or Subscription). Important: use the Managed Identity’s Object Id as the assignee argument. You can find it listed as “Object (principal) ID” in the Portal’s Overview panel for the Managed Identity in question, or listed under “principalId” in the response to the command az identity show --resource-group resource-group --name cruel-summeries-id
1
az role assignment create --assignee managed_id_object_id --role "Key Vault Secrets User" --scope "/subscriptions/swifty-subscription-id/resourcegroups/resource-group/providers/Microsoft.KeyVault/vaults/cruel-summeries-secrets"
Read more about az role assignment.
Azure PowerShell
As with the cli, we’ll need the Managed Identity’s Object Id, which is easy to get in PowerShell with one cmdlet:
1
$objectId = (Get-AzADServicePrincipal -DisplayName cruel-summeries-id).id
Then we can pass it in to the role assignment:
New-AzRoleAssignment -ObjectId $objectId -RoleDefinitionName "Key Vault Secrets User" -Scope "/subscriptions/swifty-subscription-id/resourcegroups/resource-group/providers/Microsoft.KeyVault/vaults/cruel-summeries-secrets"
4. Assign the Managed Identity to the App
Now your Managed Identity has the permission it needs, but your Web App still doesn’t, because the two things aren’t related. We now assign the Identity to the App so when the App tries to access the secret, the Key Vault reads the credentials of the Identity.
Portal
Go to your web app, which is probably called cruel-summeries-webapp. Use the menu to find the Settings -> Identity panel, and select the User Assigned tab at the top. Then click the big blue button to find your managed identity from the list and assign it.
Easy!
However - this might not be enough to associate the identity in some cases. See step five to make sure you belt-and-braces your app configuration by manually passing the Managed Identity’s Client Id too.
az cli
This one’s slightly different as we use the webapp route into the az cli. Confusingly, this time we don’t use the object id for the managed identity but its name, which seems simpler: but it also has to be fully qualified with subscription id and provider details, which is a bit clumsy to type out, as follows:
1
az webapp identity assign --resource-group resource-group --name cruel-summeries-webapp --identities "/subscriptions/swifty-subscription-id/resourcegroups/resource-group/providers/Microsoft.ManagedIdentity/UserAssignedIdentities/cruel-summeries-id
Read more about the az webapp identity command.
Azure Powershell
Bombshell: Adding a user-assigned identity in App Service by using Azure PowerShell is currently not supported.. 
And that’s why I try to get my head around the az cli, and the portal, and powershell all at once. You never know!
5. Update the app code with Azure Credentials
Some coding, at last. This’ll bring it all together.
Maybe you’ve got something like this:
1
2
3
4
string connectionString = builder.Configuration.GetConnectionString("SwiftConnection") ?? throw new InvalidOperationException("Connection string 'SwiftConnection' not found.");

builder.Services.AddDbContext<CutlersProductionContext>(options =>
    options.UseSqlServer(connectionString));
Instead of assuming the Connection String is in our configuration, what we do instead is connect to the Key Vault first and get it from there. We do this by invoking the almost magical DefaultAzureCredential() object while we’re developing, and the more precise ManagedIdentityCredential() in Production.
And don’t worry, appsettings lovers - we’ll still be making use of our config files!
Default Azure Credential
This clever little guy runs down a list of possible credentials & identities in its environment, stopping when it gets to one that works. This is the list:
- EnvironmentCredential
- WorkloadIdentityCredential
- ManagedIdentityCredential
- VisualStudioCredential
- VisualStudioCodeCredential
- AzureCliCredential
- AzurePowerShellCredential
- AzureDeveloperCliCredential
- InteractiveBrowserCredential
- BrokerCredential
As a .NET Developer / Microsoft stack devotee / Taylor Swift fan, you probably have one or more of those credentials active at any one time, and DefaultAzureCredential will use it to get you the access you need. Read more about Default Azure Credential here.
Very clever, and totally useable in Production - but it might be easier not to, as the ManagedIdentityCredential is right there for just this purpose.
Managed Identity Credential
Because DefaultAzureCredential is a bit of a catch-all, the docs point out some obvious production drawbacks like debugging (it can be tricky to figure out which credential is being used/causing you problems), performance overhead (it tries out multiple credentials rather than just using the right one) and general unpredictable behaviour when you mess with environment variables. I don’t think they make it an absolute no-no, but you have the Managed Identity Credential there to make use of if any of that horrifies you.
This works very similarly to Default, except we provide it with a Managed Identity Client Id directly and remove all ambiguity.
The Code
Prep: First, make sure to dotnet add package both Azure.Identity and Azure.Security.KeyVault.Secrets. Then, make sure you’ve got your Key Vault URI to hand. If you’ve been following along, it should be something like https://cruel-summeries-secrets.vault.azure.net/. Finally, get your Managed Identity’s Client Id (not the Object Id we’ve been using for az cli). It can be found on the Overview page (under Client ID) or listed under clientId after running az identity show --resource-group resource-group --name cruel-summeries-id.
Provide both as variables to your environment whichever way you love most: appsettings, Environment Variables - being mindful that these too can be considered sensitive.
Then we connect to the Key Vault in Program.cs:
1
2
3
4
5
6
string keyVaultUri =Environment.GetEnvironmentVariable("KEY_VAULT_URI") ?? throw new ConfigurationNotFoundException("Key Vault Uri not found in environment.");
string? managedIdentityClientId = builder.Environment.IsDevelopment() ? null : Environment.GetEnvironmentVariable("AZURE_CLIENT_ID") ?? throw new ConfigurationNotFoundException("AZURE CLIENT ID not found in environment")

SecretClient secretClient = new(
  new Uri(keyVaultUri), builder.Environment.IsDevelopment() ? new DefaultAzureCredential() : new ManagedIdentityCredential(managedIdentityClientId)
  );
Here we create a SecretClient using the DefaultAzureCredential in the dev environment, but rely on ManagedIdentityCredentials in production. We don’t need the Id in dev mode so we just let the string? be null.
Once we’re connected, it’s simple to retrieve secrets by name, and then use their .Value (string) where we need it:
1
2
3
KeyVaultSecret swiftContext = secretClient.GetSecret("cruel-summeries-db-cstring") ?? throw new ConfigurationNotFoundException("Connection String secret not found in Key Vault");

builder.Services.AddDbContext<WebAppContext>(options => options.UseSqlServer(swiftContext.Value));
Ooh, look what you made me do.
Conclusion
That’s it. You’ve got a key vault with a secret, a virtual bod that can access that secret, and you’ve mapped that bod to an app. Gavin doesn’t need to get anywhere near the connection string at any point. Sorry Gavin: leaking secrets has its consequence and that’s on you, babe.
Apply this to every API and signing key in a complex app and you’ve got a robust way of keeping those secrets in a manageable, versioned state far away from your code and environment variables - which, in addition to being more secure, provides a bit of organisational peace of mind. No more nights spent sleepless in the onyx night as you wonder about leaks.
Further thoughts
There’s a whole lot you can do programmatically with secrets and managed identities, both together and separately: like giving your Managed Identity itself RBAC access to the Azure SQL Server resource so you don’t need the connection string at all. There’s also a really good integration with the PowerShell Secret Management Module that lets you use the handy Get-Secret cmdlet to grab a secret by name and other fun things. I might cover those in later posts.