Secure Azure Resources with Private Links

Keeping It In-House
As there’s a cloud-native / web-based focus to a lot of the projects I work on, with various API integrations across the board, it’s easy to think only in ‘public internet’ terms: using URLs and public FQDNs linking services together over the web.
When I’m building applications for clients, though, it can be beneficial (or indeed critical) to ensure that data doesn’t leave a specific eco system, like a virtual network.
While the concept is elementary (stay within network bounds), like all things in the Azure space, the terminology and setup steps involved can feel complicated and add non-trivial cognitive overhead to the whole thing. As I’m frequently my own dev team, infrastructure team, QA and maintainer, there’s just a lot of Azure-y stuff to stay on top of.
So this is a guide / cheat sheet for my future self when this inevitably comes up again, which I’m making public in case it’s useful for others.
As with most things in the cloud deployment world, there’s quite a few ways to solve this problem. This is just one.
Objective: Internal-Only Connection Between Resources
Remembering & tracking private network IP Addresses is horrible. Allow-listing services via Public IP is error prone, inflexible and not fool proof. What if we could route our requests over our local network while still using our extremely helpful human-readable resource names?
Good news! Azure has the concepts of Private Links & Private DNS (Domain Name Services) Zone. At risk of oversimplifying, using these tools together allow you to add ‘locally scoped’ DNS records which in effect override the global DNS whenever they are called from inside the ‘zone’. You can use ‘normal looking’ URLs in connection strings and configuration files which will be routed internally within your network.
So if you’re already using a .azurewebsites.net FQDN for your API, correctly configuring the Private DNS & Links will allow you to keep using that FQDN but without opening up your API to any public traffic at all.
This means you can web together various services using very familiar concepts but keep your wall up everywhere except your specific, secured points of access.
Layered Example: Database, API, Website.
Now, there’s a million ways of looking at Authentication & Authorisation for these, but our focus here is going to be on creating private access to each layer from the layer above, so I’m not going to go into API security, JWTs, Identity and whatnot. Whatever the specifics of your set up, it’s worth implementing strong auth as well as network layer security like this. Belt and braces.
Let’s say you run a Final Fantasy fan club for people in West Sussex. The two things your members love most are Final Fantasy and data security. You build them a members-only website they can log in to, build a profile, and use to swap notes about Materia combinations.
There are three components to your project:
- Data Layer: The Azure SQL Resource which will hold all the member information
- API Layer: A Minimal Web API which will provide endpoints to fetch and update the data.
- Web Layer: Consumes the API to provide a beautiful, moogle-adorned front end for your members.

Your Web Layer needs to be accessible all over the world to your users.
The API layer only needs to be accessible to the website itself, at this point in time - you’re not building an iOS app or any other front end (yet! but you’ve got plans, big plans!).
Similarly, the database only needs to be accessible to the API layer.
(There are more complex examples out there but this simple setup helps us focus on what’s important: exposing these services internally, not externally).
Default FQDNs
Typically, when you build all these services (as App Service Web Apps and an Azure SQL Resource), they’ll automatically be predesignated with a URL which looks likes the below (assuming the first part of each is the name you chose when you created your resource) and - if public network access is on and unrestricted - will be reachable over the public internet:
Website: sussexfffansweb.azurewebsites.net
API: sussexfffansapi.azurewebsites.net
Database: sussexfffansdb.database.windows.net
Configuration in Azure
Connect the API to the Database
Let’s assume we’re building a .NET Web API and using Environment Variables to pass connection strings and other info to our applications. Note that the core principles of the Private DNS & Private Link will work the same regardless of your implementation or stack - they all happen at the network, not application, level.
The API will need the Database’s connection string. If we’ve got something like this in Program.cs code:
1
2
3
4
string connectionString = builder.Configuration.GetConnectionString("DefaultConnection") ?? throw new InvalidOperationException("Connection string 'DefaultConnection' not found.");

builder.Services.AddDbContext<ApplicationDbContext>(options =>
    options.UseSqlServer(connectionString));
Then we’d set up a DefaultConnection Connection String with something like this:  You might even be being extremely sensible and using Managed Identities and the Key Vault instead of Environment Variables. Well done you. No wonder the members elected you to be their leader.
Connect the Website to the API
Let’s imagine our website is running in PHP. The fetch method for member data from the API might look something like this:
1
2
3
4
5
6
7
8
9
10
11
12
13
14
15
16
17
18
19
20
21
22
23
24
25
26
27
28
29
30
31
32
33
34
35
36
37
38
39
40
41

function getFFFansApiData($url, $bearerToken) {
    // cURL
    $curl = curl_init();

    // cURL options
    curl_setopt_array($curl, [
        CURLOPT_URL => $url,
        CURLOPT_RETURNTRANSFER => true,
        CURLOPT_HTTPHEADER => [
            'Authorization: Bearer ' . $bearerToken,
            'Accept: application/json',
            'Content-Type: application/json'
        ],
        CURLOPT_SSL_VERIFYPEER => true,
        CURLOPT_TIMEOUT => 30
    ]);

    // Execute request
    $response = curl_exec($curl);
    $httpCode = curl_getinfo($curl, CURLINFO_HTTP_CODE);
    $error = curl_error($curl);

    curl_close($curl);

    // Skipping over any error handling etc etc
    $data = json_decode($response, true);

    return $data;
}

$apiUrl = 'https://sussexfffansapi.azurewebsites.net/members';
$token = 'hyper-secure-key';
$result = getApiData($apiUrl, $token);

if (isset($result['error'])) {
    echo "Error: " . $result['error'];
} else {
    // Output the data lovingly
}
We Are All Connected
So far, so good. If you’ve got public access enabled, you’re now connected. Wahoo.
The issue is, so is everybody else with that API URL or worse, your Database Connecting String.
That’s probably fine, because you’ve secured your resources at the user level using the principle of least privilege - right? And you have total confidence in your users not to be tricked into leaking their credentials to malicious Dragon Quest fans - right?
Right?

Let’s Privatise
If you don’t like the idea of free public access (to universal healthcare, or your Azure resources) you can choose to privatise. Note that this guide only covers the latter scenario.
Remember, our twin goals here are restricting traffic to just our network, and keeping our URLs human-readable and flexible by avoiding referencing IP addresses directly.
Reminder: What DNS Does
DNS is responsible for translating human readable URLs into machine-readable IP Addresses, through a process called resolution. In the setup we’ve outlined already:
sussexfffansdb.database.windows.net → resolves to a public IP.
sussexfffansapi.azurewebsites.net → resolves to a public IP.
We want to short-circuit this DNS so that we can use those memorable(ish) URLs put avoid those public IP addresses. Private Endpoints give your resources a private IP, accessible only to other networked services, and Private DNS gives reroutes the existing URLs to point at those private IP addresses.
And it’s pretty easy if you know the right things to click.
Steps
- Create a VNET and make sure all your resources are in it.
- Create a Private Endpoint for each resource along with Private DNS Zone(s)
- Turn off public (internet) access.
1. VNET
The VNET is the base layer. For this to work, either create a new Virtual Network service or integrate your resources with an existing one.
Integrate App Services
All app services on a Standard tier or above can be integrated into a Virtual Network using the Virtual Network Integration option in the Network tab of their Configuration in the portal:

Very little configuration is required: you’ll just have to create a new subnet for App Services the first time you integrate an App Service (it’s an Azure thing), though you can put both of the Web Apps into the same subnet. This step gives your Apps connectivity to your network.
Integrate Database
This one’s a little more confusing as Azure SQL Server resources have two very similar sounding network configuration settings:
Virtual Network Rules which, to quote the portal, “Allow virtual networks to connect to your resource using service endpoints”
and Private Access Endpoints which “allow access to this resource using a private IP address from a virtual network, effectively bringing the service into your virtual network.”
It’s the latter we’re interested in here because the Virtual Network Rules still use the public IP - it’s just a way of “allow listing” requests from a given vnet. Functionally it can produce similar results, but ultimately the traffic is still going over the public internet - it’s not full private connectivity.
So - let’s move onto Private Endpoints.
2. Create Private Endpoints & Zones
Private Endpoints are an Azure Resource which give a network-routable front door to something else - essentially an NIC in a VNet with a private IP. The Endpoint is tied to a specific resource (SQL server, App Service, Storage, etc.) which is then accessible over that private IP (instead of or in addition to a Public IP, depending on your configuration).
Add Private Endpoint to Database
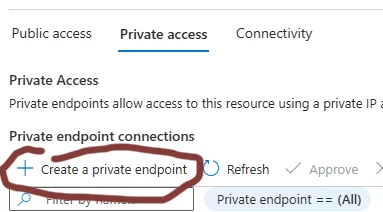
Head to your Azure SQL Server resource. Use the Private access tab under the Networking options and choose Create a private endpoint:
Go through the Basics, Resource and Virtual Network steps - it doesn’t strictly matter what you name your endpoint though you’ll be thankful to yourself if you don’t name it something dumb and confusing. You may need to create a new subnet, too - you can put all your Private Endpoints in there if you like to feel organised.
Pause when you get to the DNS step. We want to integrate with a Private DNS Zone. You can create one right here! It’ll be called privatelink.database.windows.net by default - which isn’t sexy, but it works.
That’s actually all the setup required for the DB.
But what is the ‘Zone’?
Private DNS Zone
 Unlike FFVIII’s Zone, these are actually useful.
A Private DNS Zone is like a ‘local override’ so that queries from inside the VNet use its records instead of public DNS records. In Azure, they have default names like privatelink.database.windows.net or privatelink.azurewebsites.net and contains A records mapping the resource’s original hostname to the private IP. So if “xyz.net” is mapped to “10.0.0.3”, requests made to “xyz.net” will end up there, not wherever the rest of the world thinks xyz.net is.
DNS Resolution Example
- The API says: “Where is sussexfffansdb.database.windows.net?”
- DNS checks the Private DNS Zone first (because it’s linked to the VNet).
- The Zone returns the private IP of the Private Endpoint.
- The API connects privately (and TLS still works because the hostname hasn’t changed).
Add Private Endpoint to App Service Web App
Head back to the configuration for your API App (which you’ve already integrated with the VNET), go to the Networking Tab, and click the bit that says “0 Private Endpoints” to configure a new one. 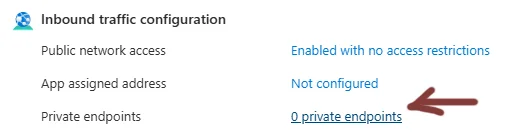 Follow the “Express” setup to swiftly add one.
Testing!
You can make sure it’s worked by running this az cli command: az network private-dns record-set a list --zone-name privatelink.azurewebsites.net --resource-group your-resource-group
You should get something like the following (simplified) JSON response, which states that the FQDNs resolve to private, not public, IP Addresses:
1
2
3
4
5
6
7
8
9
10
11
12
13
14
15
16
17
18
19
20
21
22
23
24
25
26
[
  {
    "aRecords": [
      {
        "ipv4Address": "10.0.0.10"
      }
    ],
    "fqdn": "sussexfffansapi.privatelink.azurewebsites.net.",
    "id": "etc/providers/Microsoft.Network/privateDnsZones/privatelink.azurewebsites.net/A/sussexffansapi",
    "name": "sussexffansapi",
    "type": "Microsoft.Network/privateDnsZones/A"
  },
  {
    "aRecords": [
      {
        "ipv4Address": "10.0.0.10"
      }
    ],
    "etag": "7ba80beb-792b-4c52-894f-97a70b50160e",
    "fqdn": "sussexffansapi.scm.privatelink.azurewebsites.net.",
    "id": "etc/providers/Microsoft.Network/privateDnsZones/privatelink.azurewebsites.net/A/sussexffansapi.scm",
    "name": "sussexffansapi.scm",
    "ttl": 10,
    "type": "Microsoft.Network/privateDnsZones/A"
  }
]
Repeat the command with the zone name privatelink.database.windows.net to test it’s worked for the database, too.
3. Turn off Public Internet Connectivity
Now you can safely turn off Public Access to both your Database and API apps (and then test them, naturally). Your website should happily call the API over your private network, and your API should happily interact with the database privately too.
4. Update Your Connection Strings & URLs with tedious private IP Addresses
Just kidding. This is the step we don’t need, thanks to the magic of Private Links.
Conclusion
Using built in Azure tools, it’s relatively easy to route app-to-app-to-db traffic internally over your cloud virtual network, without having to do any manual management of IP addresses. This should be a great relief to your security-conscious members who don’t want their Chocobo Hot & Cold Secret Items guides falling into the wrong hands.